WLAN Schaltsteckdose
Inhaltsverzeichnis
Allgemeines
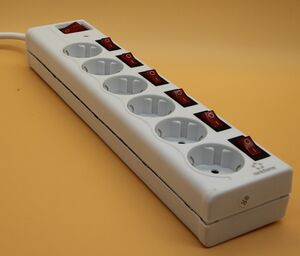
"OMG, warum baut der eine WLAN-Steckdosenleiste, wenn's sowas doch fertig zu kaufen gibt?" [1]
Die meisten, bzw. alle, die ich bis jetzt gefunden habe erfuellen nicht alle Kriterien und die Betonung liegt auf Steckdosenleiste.
Auswahlbedingungen:
- Rueckmeldefunktion: schaltbar von mehreren "Stellen" mit gegenseitiger Anzeige des aktuellen Schaltzustandes.
- FHEM-Intergration, oder "offene"-Schnittstelle. Eine Smartphone-App-Steuerung ist ja selten daemlich.
- Cloudfree Wie viele Apps/Clouds soll ich noch installieren.
- Skalierbar 2,3,4,... Steckdosen.
- evtl. Dimmerfunktion
- Preis, selbst wenn man SONOFF (z.B. SONOFF POW R2 1 Kanal Schaltaktor WLAN, mit Messfunktion) nimmt.
Smartphone-App-Steuerung
Schalten muss schnell und einfach sein!
Was nutzt es mir wenn ich fuer jeden Smartplug-Hersteller eine andere App benoetige.
Selbst wenn ein Schlauer auf die Idee kommt, alles in einer App zu integrieren, muss ich idR die App oeffnen und navigieren. Da nutzen auch keine SprachassistentINNEN, solange ER nicht Jarvis heiszt und mit WENIGEN Angaben weiss, was ER zu tun hat.
Vorhaben 1
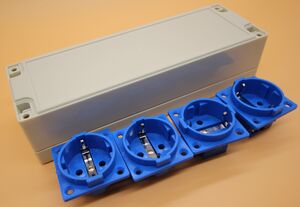
Einzeln schaltbare Steckdosenleisten sind schon unter 10 Euro zu haben. Ein Umbau lohnt eigentlich nicht. Da die Einbausteckdose 713 von Bals schon fuer 2 Euro/Stueck zu haben ist. Na gut, man muss den Gehaeusepreis dazurechnen. Als Gehaeuse kann ein Stueck Kabelkanal dienen.
Vorhaben 2
Vorhaben 3
NodeMCU
Allen Vorhaben liegen aehnliche Vorderungen zugrunde.
- WLAN-Anbindung
- MQTT-Steuerung
- Toggletaster
- Signalisierung Schaltzustand
- 1-polige-/2-polige-Trennung
...
Software
Ausgehend von dem Testprgramm aus dem Artikel NodeMCU beginnt jetzt die Bereinigung, Optimierung und Anpassung des Codes. Der Uebersichtlichkeit geschuldet packe ich die Kommentare in den Quellcode.
Forderung an die Software:
- Parameter zur Anpassung
- Interrupts
  1 //funktioniert 20210821 mit NodeMCU ueber USB
  2 //Blink fehlt noch
  3 #include <Arduino.h>            // in den DHT examples benutzt
  4 #include <Ticker.h>             // in den DHT examples benutzt, esp8266 library that calls functions periodically
  5 #include <ESP8266WiFi.h>        // Include the Wi-Fi library
  6 #include <PubSubClient.h>       // MQTT
  7 #include <DHT.h>                // DHT Temp/Hum DHT11 DHT22
  8 #include <PCF8574.h>            // I2C Port-Expander 8 IN/OUT
  9 #include <Wire.h>               // This library allows you to communicate with I2C / TWI devices
 10
 11
 12 // WLAN //
 13 WiFiClient espClient;
 14 const char* ssid     = "XXX";         // The SSID (name) of the Wi-Fi network you want to connect to
 15 const char* password = "YYY";     // The password of the Wi-Fi network
 16
 17
 18 // MQTT //
 19 const char* mqtt_server = "192.168.178.x";
 20 PubSubClient client(espClient);
 21 unsigned long lastMsg = 0;
 22 #define MSG_BUFFER_SIZE	(50)
 23 char msg[MSG_BUFFER_SIZE];
 24 long int value = 0;
 25
 26 // DHT //
 27 Ticker ticker;
 28 DHT11 sensor;  // change to DHT22 if needed!
 29 volatile float humidity = 0;
 30 volatile float temperature = 0;
 31 volatile uint8_t error = 0;
 32 volatile int8_t result = 0;
 33 int grad = 248; // mit dem Gradzeichen gibt es schon mal Probleme
 34
 35 void readDHT() {  // Funktion eigentlich ueberfluessig, da nur eine (weitere) Funktion aufgerufen wird
 36   sensor.read();
 37 }
 38
 39 //PCF
 40 PCF8574 PCF(0x20);   // Man beachte, dass die Slave-Adresse nur 7-Bit lang ist und nicht zwischen R/W unterscheidet.
 41
 42 // this callback will be called from an interrupt
 43 // it should be short and carry the ICACHE_RAM_ATTR attribute
 44 void IRAM_ATTR handleData(float h, float t) {
 45   humidity = h;
 46   temperature = t;
 47   result = 1;
 48 }
 49
 50 // this callback will be called from an interrupt
 51 // it should be short and carry the ICACHE_RAM_ATTR attribute // ICACHE_RAM_ATTR veraltet
 52 void IRAM_ATTR handleError(uint8_t e) {
 53   error = e;
 54   result = -1;
 55 }
 56
 57 void callback(char* topic, byte* payload, unsigned int length) {
 58   Serial.print("Message arrived [");
 59   Serial.print(topic);
 60   Serial.print("] ");
 61   for (unsigned int i = 0; i < length; i++) {
 62     Serial.print((char)payload[i]);
 63   }
 64   Serial.println();
 65
 66   // Switch on the LED if an 1 was received as first character
 67   // Ein Moeglichkeit der Auswertung um Schaltzustaende zu aendern
 68   if ((char)payload[0] == '1') {
 69     digitalWrite(LED_BUILTIN, LOW);   // Turn the LED on (Note that LOW is the voltage level
 70     // but actually the LED is on; this is because
 71     // it is active low on the ESP-01)
 72   } else {
 73     digitalWrite(LED_BUILTIN, HIGH);  // Turn the LED off by making the voltage HIGH
 74   }
 75
 76 }
 77
 78 // MQTT Verbindung nicht vorhanden
 79 void reconnect() {
 80   // Loop until we're reconnected
 81   while (!client.connected()) {
 82     Serial.print("Attempting MQTT connection...");
 83     // Create a random client ID
 84     String clientId = "ESP8266Client-";
 85     clientId += String(random(0xffff), HEX);  // ClientID muss in die global configs
 86     // Attempt to connect
 87     if (client.connect(clientId.c_str())) {
 88       Serial.println("connected");
 89       // Once connected, publish an announcement...
 90       client.publish("outTopic", "hello world");   // outTopic muss in die global configs
 91       // ... and resubscribe
 92       client.subscribe("inTopic");
 93     } else {
 94       Serial.print("failed, rc=");
 95       Serial.print(client.state());
 96       Serial.println(" try again in 5 seconds");
 97       // Wait 5 seconds before retrying
 98       delay(5000);
 99     }
100   }
101 }
102
103 void setup() {
104   pinMode(LED_BUILTIN, OUTPUT);     // Initialize the BUILTIN_LED (alte Bezeichnung) pin as an output
105
106  // Die ganze serielle Kommunikation braucht man eigentlich nur zum  Debuggen
107   Serial.begin(115200);         // Start the Serial communication to send messages to the computer
108   delay(10);
109   Serial.println('\n');
110
111   //sensor.setup(D4);
112   sensor.setPin(D8);
113   sensor.onData(handleData);
114   sensor.onError(handleError);
115   ticker.attach(30, readDHT);
116
117   WiFi.mode(WIFI_STA);// ist scheinbar der defaultwert wird in letzter Version nicht benutzt
118   WiFi.begin(ssid, password);             // Connect to the network
119   Serial.print("Connecting to ");
120   Serial.print(ssid); Serial.println(" ...");
121
122   int i = 0;
123   while (WiFi.status() != WL_CONNECTED) { // Wait for the Wi-Fi to connect
124     delay(1000);
125     Serial.print(++i); Serial.print(' ');
126   }
127
128   randomSeed(micros());
129
130   Serial.println('\n');
131   Serial.println("Connection established!");
132   Serial.print("IP address:\t");
133   Serial.println(WiFi.localIP());         // Send the IP address of the ESP8266 to the computer
134
135   client.setServer(mqtt_server, 1883);
136   client.setCallback(callback);
137
138   PCF.begin();
139 }
140
141 void loop() {
142   if (result > 0) {
143     Serial.printf("Humid: %g %%\n", humidity);
144     Serial.println();
145     Serial.printf("Temp: %3.1f %cC\n", temperature,grad);
146     Serial.println();
147   } else if (result < 0) {
148     Serial.printf("Error: %s\n", sensor.getError());
149   }
150   result = 0;
151   if (!client.connected()) {
152   reconnect();
153   }
154   client.loop();
155
156   unsigned long now = millis();
157   if (now - lastMsg > 2000) {
158     lastMsg = now;
159     ++value;
160     snprintf (msg, MSG_BUFFER_SIZE, "hello world #%ld", value);
161     Serial.print("Publish message: ");
162     Serial.println(msg);
163     client.publish("outTopic", msg);
164     PCF.toggle(4);
165   }
166 }
MQTT Topics
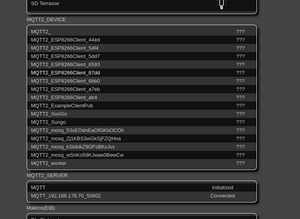
Zur Zeit zeigt sich durch Tests in FHEM noch Kraut und Rueben.
Hier mal eine kleine Zusammenstellung der Dos and Donts or Best practices
Never use a leading forward slash
A leading forward slash is permitted in MQTT. For example, /myhome/groundfloor/livingroom. However, the leading forward slash introduces an unnecessary topic level with a zero character at the front. The zero does not provide any benefit and often leads to confusion. Topic names must consist of at least one character to be valid.
/
is already a topic name.
Never use spaces in a topic
A space is the natural enemy of every programmer. When things are not going the way they should, spaces make it much harder to read and debug topics. As with leading forward slashes, just because something is allowed, doesn’t mean it should be used. UTF-8 has many different white space types, such uncommon characters should be avoided.
Keep the topic short and concise
Each topic is included in every message in which it is used. Make your topics as short and concise as possible. When it comes to small devices, every byte counts and topic length has a big impact.
Use only ASCII characters, avoid non printable characters
Because non-ASCII UTF-8 characters often display incorrectly, it is very difficult to find typos or issues related to the character set. Unless it is absolutely necessary, we recommend avoiding the use of non-ASCII characters in a topic. Embed a unique identifier or the Client Id into the topic It can be very helpful to include the unique identifier of the publishing client in the topic. The unique identifier in the topic helps you identify who sent the message. The embedded ID can be used to enforce authorization. Only a client that has the same client ID as the ID in the topic is allowed to publish to that topic. For example, a client with the client1 ID is allowed to publish to client1/status, but not permitted to publish to client2/status.
Don’t subscribe to #
Sometimes, it is necessary to subscribe to all messages that are transferred over the broker. For example, to persist all messages into a database. Do not subscribe to all messages on a broker by using an MQTT client and subscribing to a multi-level wildcard. Frequently, the subscribing client is not able to process the load of messages that results from this method (especially if you have a massive throughput). Our recommendation is to implement an extension in the MQTT broker. For example, with the plugin system of HiveMQ you can hook into the behavior of HiveMQ and add an asynchronous routine to process each incoming message and persist it to a database.
Don’t forget extensibility
Topics are a flexible concept and there is no need to preallocate them in any way. However, both the publisher and the subscriber need to be aware of the topic. It is important to think about how topics can be extended to allow for new features or products. For example, if your smart-home solution adds new sensors, it should be possible to add these to your topic tree without changing the whole topic hierarchy.
Use specific topics, not general ones
When you name topics, don’t use them in the same way as in a queue. Differentiate your topics as much as possible. For example, if you have three sensors in your living room, create topics for myhome/livingroom/temperature, myhome/livingroom/brightness and myhome/livingroom/humidity. Do not send all values over myhome/livingroom. Use of a single topic for all messages is a anti pattern. Specific naming also makes it possible for you to use other MQTT features such as retained messages. For more on retained messages, see part 8 of the Essentials series.
Diese Zusammenstellung empfand ich als sehr hilfreich.
In meinem Haus hat jeder Raum bereits eine Nummer mit vorangestelltem UG, EG und DG. Jetzt kaeme noch der Garten als neuer "Raum" dazu. Oder ich entscheide eine Stufe darueber bereits zwischen Haus und Garten. Da ich im Garten zwischen Pool Carport unterscheiden will, muss ich wohl auch noch eine Unterteilung nach Terrasse hinzufuegen. Bisher habe ich das alles in FHEM unter "Auszen" zusammengefasst. Die erste Ebene waere also Haus/Außenanlage, Außenbereich oder einfach nur Außen.
Noch etwas detaillierter geht es hier weiter.
Ein erster Versuch fuer mich sieht dann so aus (weder am Anfang noch am Ende steht ein Slash):
Haus/[UG,EG,DG]/[1-9]+/ClientID/Art
Außen/[Terrasse,Veranda,Garten,Pool,Carport,...]/ClientID/Art
Art waere dann [Schalter,Temperatur,Feuchtigkeit,Dimmer,...]
Einen Payload im JSON-Format benoetige ich erst mal nicht. Ich werde nach Moeglichkeit numerische Payloads gebrauchen. Spaetestens wenn man mehrere Schalter in einem Client vereint stellt sich die Frage ob ich z.B. fuer jeden Schalter einen Topic anlege, oder im Topic Schalter eine Zahl als Repraesentation aller Schalter uebergebe.
Zum Beispiel:
..../ClientID/Schalter1 0
..../ClientID/Schalter2 0
..../ClientID/Schalter3 1
..../ClientID/Schalter4 0
..../ClientID/Schalter5 1
oder
..../ClientID/Schalter 00101
Da ich im zweiten Beispiel den aktuellen Zustand erst bestimmen muss um die Message zu erzeugen faellt die Wahl auf die erste Variante. Auf Unterstriche zur Bedeutungs-/Worttrennung verzichte ich.
DEBUG-Mode
Die ganzen Serial-Prints kommen in eine bedingte Kompilierung.
Hardware
Links
https://cmatic.de/?accessid=2&id=16


Die automatische Aktualisierung der Kommentare aktivieren.